How to Maintain Your Water Softener System for Longevity
February 15, 2026
Introduction
A water softener is one of the most valuable systems in your home — quietly protecting your plumbing, appliances, and even your skin from Indiana’s notoriously hard water. But like any appliance, it needs regular care to perform its best over time.
Many homeowners assume that once their softener is installed, it runs indefinitely with little attention. The truth is, a little maintenance goes a long way toward preventing costly repairs, salt waste, and early system failure.
In this guide, we’ll walk through how to properly maintain your water softener, how often to do it, and simple steps to extend its lifespan for years of smooth, clean, and efficient operation.
Why Maintenance Matters
The Role of Your Water Softener
Water softeners remove hardness minerals — primarily calcium and magnesium — through a process called ion exchange. Over time, these minerals build up inside the softener’s resin tank, where they’re replaced by sodium ions during regeneration.
Without maintenance, several problems can develop:
- Clogged resin beds that reduce efficiency.
- Salt bridges or mushing that block brine flow.
- Dirty brine tanks that promote bacterial growth.
- Inefficient regeneration cycles that waste salt and water.
A well-maintained softener not only improves water quality but also protects your investment, keeping your plumbing system running smoothly and extending the life of your appliances.
Signs Your Water Softener Needs Attention
Knowing when to service your system is key. Common signs include:
- Water feeling “harder” again (soap doesn’t lather well).
- Visible spots or scale on dishes and fixtures.
- Water pressure dropping or fluctuating.
- Salt levels not decreasing despite usage.
- Discolored water during regeneration.
If any of these appear, your softener is telling you it’s time for maintenance.
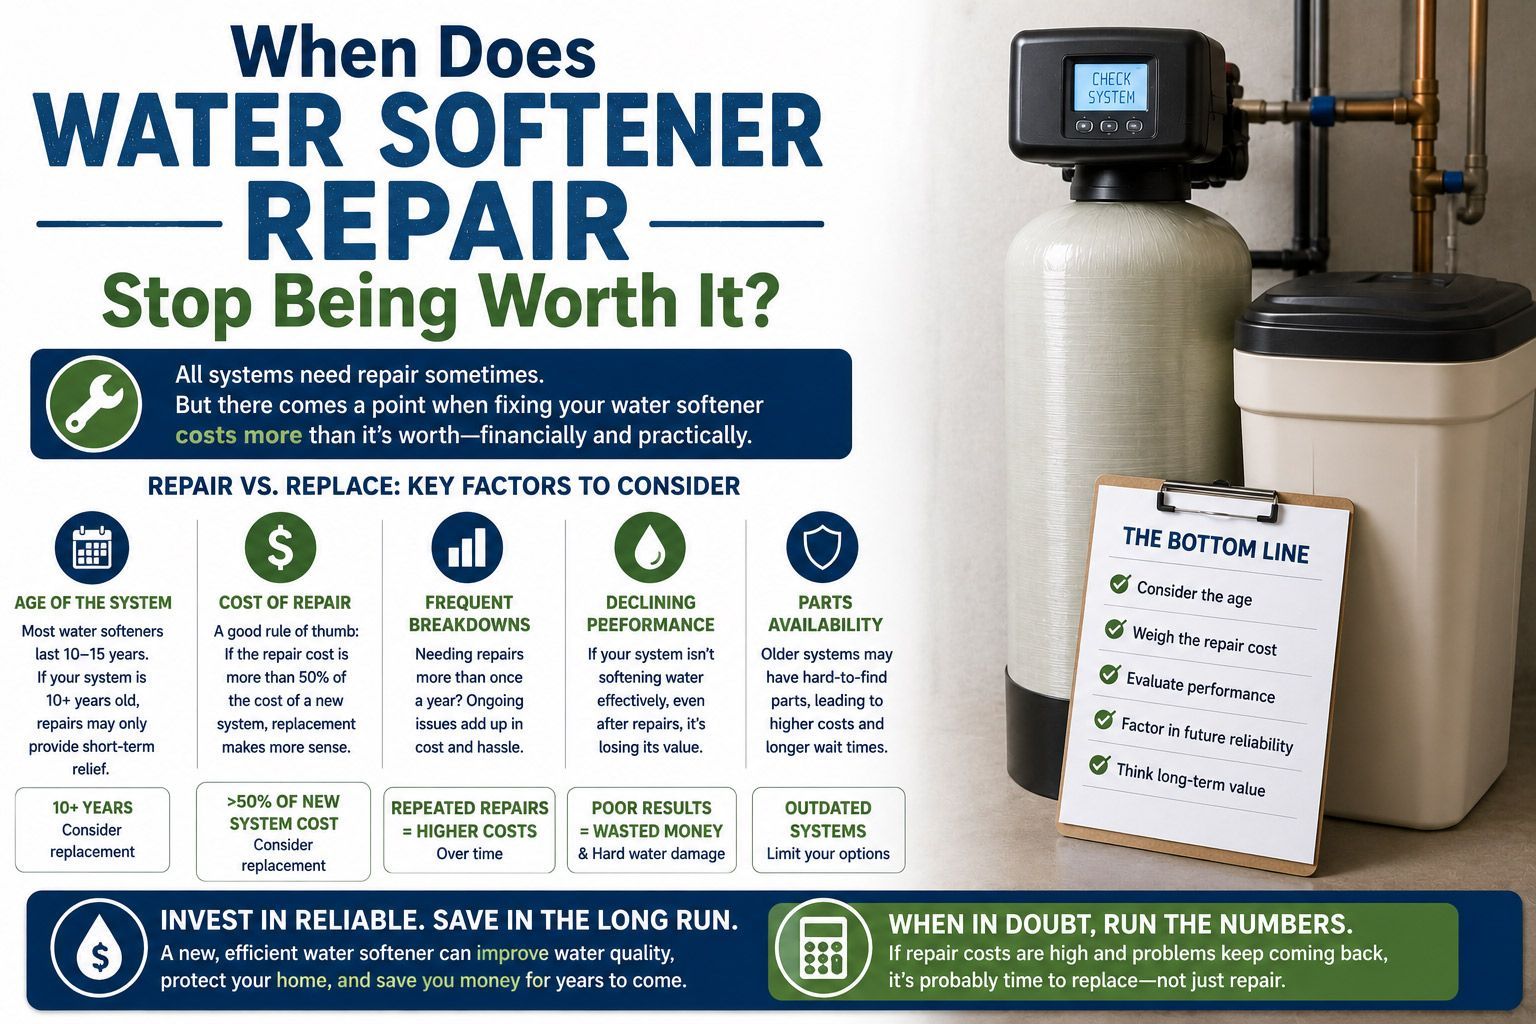
The Core Components of a Water Softener System
To understand maintenance, it helps to know what’s inside your system:
- Brine Tank: Holds salt that’s mixed with water to create a brine solution used for regeneration.
- Resin Tank: Contains the resin beads that perform ion exchange.
- Control Valve: Manages water flow and regeneration cycles.
- Bypass Valve: Allows water to bypass the system during maintenance.
Each component plays a specific role — and regular care keeps them working together efficiently.
Step-by-Step Maintenance Guide
Step 1: Check Salt Levels Regularly
Your softener relies on salt to recharge the resin beads. Too little salt, and the system can’t remove hardness effectively.
How often: Every 4–6 weeks (more often in high-use homes).
What to do:
- Open the brine tank lid and ensure salt is above the water level by a few inches.
- Keep the tank at least half full but avoid overfilling — leave space for air circulation.
- Use
high-purity salt pellets or cubes instead of rock salt to reduce buildup and debris.
Step 2: Break Up Salt Bridges
Sometimes salt forms a hard crust (bridge) inside the tank, giving the illusion that the tank is full even though water below isn’t reaching the salt.
How to fix it:
- Use a broom handle or similar tool to gently break up the crust.
- Stir the salt until loose, making sure it dissolves evenly in the water below.
Step 3: Clean the Brine Tank Annually
Over time, sediment and impurities from salt can accumulate in the tank, leading to cloudy water and reduced efficiency.
How to clean it:
- Turn off the softener and disconnect power.
- Scoop out remaining salt and brine solution.
- Scrub the tank with warm water and a mild detergent.
- Rinse thoroughly and refill with fresh salt and water.
Tip: Clean your tank once a year, preferably in early spring before heavy summer water use.
Step 4: Inspect and Clean the Venturi Valve
The venturi valve (or injector) controls the brine draw during regeneration. If it gets clogged with sediment, the system can’t pull brine into the resin tank.
What to do:
- Locate the venturi on the control valve.
- Remove, disassemble, and rinse all parts with warm water.
- Avoid using harsh chemicals; a soft brush works well.
Check this every 3–4 months, especially if your water has high iron or sediment levels.
Step 5: Sanitize the System
Bacteria and biofilm can develop in softeners, especially in systems that sit unused for long periods.
How to sanitize:
Add a water softener sanitizer (or diluted bleach) to the brine tank per manufacturer instructions.
- Run a full regeneration cycle.
- Flush the system with clean water afterward.
- Do this every 6–12 months, depending on water source and usage.
Step 6: Clean the Resin Bed
The resin beads are the heart of your system. Over time, they can become coated with iron, manganese, or organic material, reducing softening efficiency.
How to clean:
- Use a
resin cleaner compatible with your system type.
- Add it to the brine tank following the product instructions.
- Run a manual regeneration cycle.
For homes with high iron content, cleaning the resin bed every 3–4 months keeps the system performing like new.
Step 7: Schedule Professional Servicing
Even with regular DIY maintenance, professional service once a year ensures everything functions properly. A technician can:
- Inspect internal valves and seals.
- Calibrate regeneration timing.
- Test water hardness and system efficiency.
- Identify early signs of wear or damage.
Professional inspections extend lifespan and prevent small issues from becoming major repairs.
Tips to Maximize Your Water Softener’s Lifespan
Use Quality Salt
Not all salt is created equal. High-purity pellets leave fewer impurities behind, minimizing the need for frequent cleanings and preventing sludge formation.
Install a Sediment Pre-Filter
A simple sediment filter before your softener keeps sand, silt, and rust from clogging valves or damaging resin beads.
Avoid Overuse of Water During Regeneration
While your system is regenerating, try to limit water use. Drawing water mid-cycle can cause incomplete regeneration or salt dilution.
Maintain Optimal Salt-to-Water Ratio
Check your brine float assembly to ensure the correct amount of water is entering the brine tank — too much or too little impacts regeneration efficiency.
Keep an Eye on Efficiency
Monitor your water’s softness after each service or adjustment. If you notice hardness returning quickly, the control valve or resin bed may need recalibration or replacement.
How long does a water softener last?
Most systems last between 10–15 years, but with proper maintenance, many exceed 20 years of reliable use.
Can I use potassium instead of salt?
Yes. Potassium chloride is a salt alternative for people concerned about sodium. However, it’s more expensive and may require slightly higher settings to achieve the same effect.
What happens if I forget to add salt?
The softener will stop removing hardness minerals, allowing scale buildup on fixtures and appliances until refilled. Fortunately, refilling and running a manual regeneration typically restores performance.
Is cleaning the resin bed necessary?
Yes, especially if your water contains iron or manganese. Cleaning prevents fouling, which keeps the resin beads effective for years.
Should I turn off my softener if I leave for vacation?
If you’re away for more than a week, it’s a good idea to place your system in bypass mode and unplug it. This prevents unnecessary regeneration and conserves salt and water.
Conclusion
Your water softener is the unsung hero of your home — protecting your plumbing, water heater, and even your skin from the harsh effects of Indiana’s hard water. With just a little routine maintenance, you can ensure it continues running efficiently and lasts well beyond its expected lifespan.
By checking salt levels, cleaning the brine tank, inspecting valves, and scheduling professional servicing, you’ll save money on repairs and keep your home’s water consistently clean and soft.
A well-maintained softener doesn’t just extend its life — it improves yours every day with better water quality, lower energy bills, and peace of mind.